
Click here to download STL (Affiliate Link)
Despite the fact that I set out to make an ice mould for the DrinkColder and failed, I think this was a good recovery. This IceCozy is fantastic. My only regret is that it is small (so it can fit in the DrinkColder), but it still performs well and for me at least, feels so much better than using commercially made ice packs.
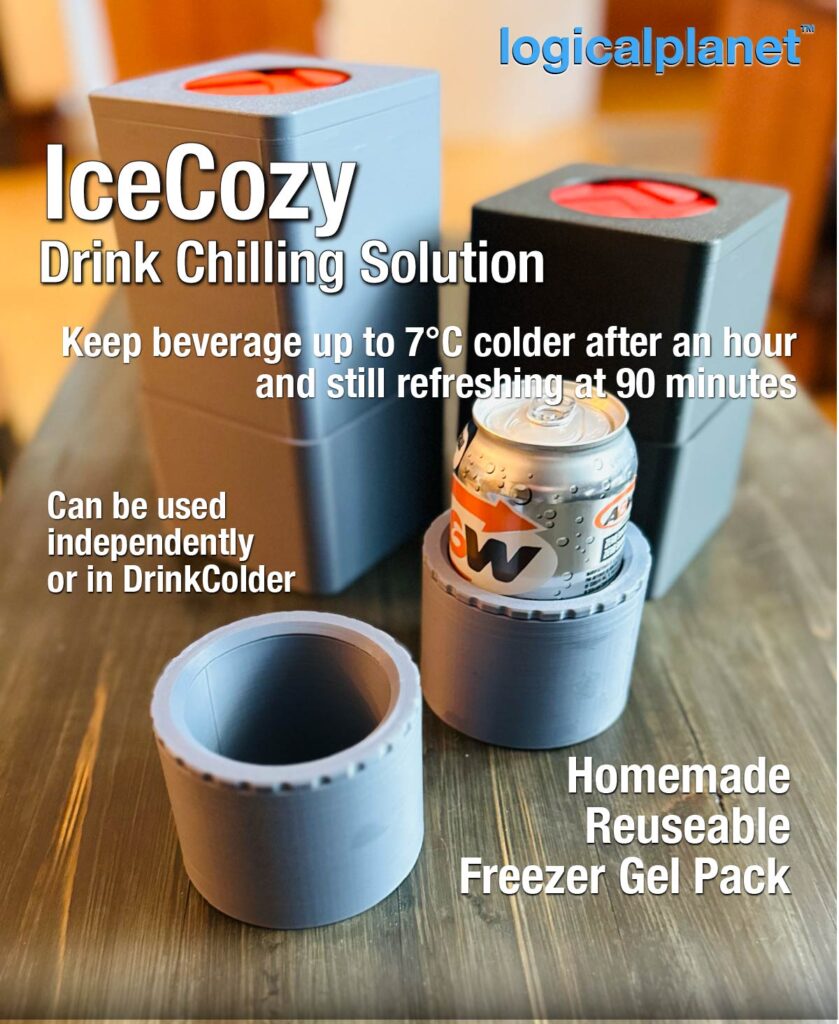
IceCozy is a homemade ice “gel” pack (or freezer pack) that you 3D print and fill with a sugar (or salt) water solution. Once frozen, it will help to keep your drink significantly more chilled when compared to not using it (See my bench test results below). I developed this for the DrinkColder, but it can be used independently in any other application.
My original attempt to make an ice mould failed for a variety of reasons, and in the end, I decided no one really wants their drink sitting in a pool of water (from the melted ice) because that means it will drip on you every time you take a sip. But more importantly, water expands (about 9%) when frozen, making it very challenging to have a precise mould and fit into the DrinkColder. On the other hand, water saturated with sugar or anything similar does not expand. So the freezer “gel” solution I am using here allows a very accurately sized case to fit snug against your beverage.
Its slim and compact size limits its cooling power, so I think I will eventually work on some larger ones that might be standalone or some other style of fun drink holder. And, they can all use this same formulation.
It is critical that you print with modified printer settings to ensure the printed part is as leak-proof as possible. If you do not know, if you simply 3d print a container, it will most certainly leak when you put water in it. There are lots of strategies for making it leak-proof, but many require you to line it with epoxy or silicone, or something similar. My goal is to use a printed part without modification. We can do that by a) increasing the flow ratio to force a tighter print, and of course, you must print with more walls, more top and bottom layers, and 100% infill. And, b) increasing the viscosity of the water solution you put inside. Since water has a very low viscosity, it leaks easily through the microscopic pores in the printed container. But converting the water solution into a gel changes its ability to flow.

So first, please review my recommended print settings carefully. Then you should have a much more leak-resistant container. And that will be good enough because we are going to fill it with a homemade high-viscosity gel that will have a difficult time flowing through any remaining microscopic holes in the printed container. Once you fill the printed container with the gel, you close it by screwing on the lid. I have made that threaded connection quite tight to improve leak resistance, so you need to apply a small amount of lubricant or cooking oil to the threads as well as the top inside wall where the lid fits.
The gel inside commercial gel packs has always kind of scared me because it looks like something you do not want to consume, yet we often place it near consumables to keep them cold. But it turns out that whether the commercial ones are toxic or not, it does not need to be. Saturating water with sugar (and/or salt) can give you a high-density solution that functions as an excellent freezer pack. And, by using a thickening agent (xanthan gum), even when it comes to room temperature (or warmer), it will have a very difficult time leaking through your printed container.
Now, with all that said, I did test putting the thickened solution into a 3d printed vessel with default print settings, and it worked. The gel solution was too thick to flow through the walls. But I do not recommend relying on that. I also tested putting the sugar water solution without the thickening agent into a container printed using my modified settings (103% flow ratio). And, it also held. This might be acceptable. But leaking a sugar solution in the hot summer sun would be bad news, so I strongly recommend doing both, using the thickening agent and printing with modified settings.
I recommend printing and making multiple IceCozies so you can always have a few frozen ones standing by. I have also included a special funnel to make filling the container easier.
Bench Testing: Performance You Can Feel – Even After an Hour
I ran a bench test using water-filled aluminum cans that I refrigerated to 3c and wireless temperature probes, comparing four different setups at room temperature (~22c):
- Can 1: On the counter – open air
- Can 2: In DrinkColder
- Can 3: In DrinkColder + our IceCozy insert
- An ambient air probe (for reference)
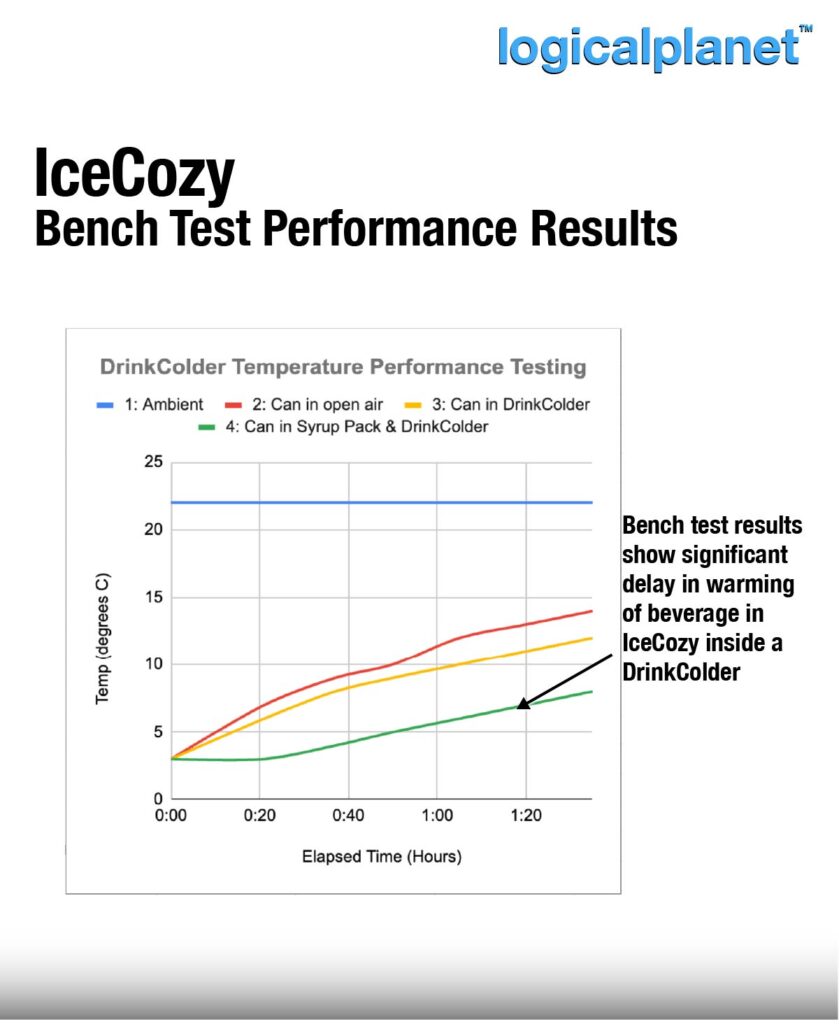
Temperature after 30 minutes:
- Open air: 9c (Cool to cold)
- DrinkColder only: 8c (Chilled, refreshing)
- IceCozy in DrinkColder: 4c (Ice Cold)
Temperature after 60 minutes:
- Open air: 13c (Cool-ish)
- DrinkColder only: 10c (Cool to cold)
- IceCozy in DrinkColder: 6c (Chilled, refreshing)
What Counts as “Cold”?
For reference, these are the temperature ranges of the coldness categories I used:
- Ice Cold = 0–4 c – “Just out of the fridge”
- Chilled, refreshing = 5–8 c – “Still cold, perfect”
- Cool to cold = 9–12 c – “Still fine” for most people
- Cool-ish = 13–15 c – “Not cold, but OK”
- Mild or warm = 16 c+ – “This is getting too warm”
So after a full hour sitting out, the IceCozy system kept the drink in the “Chilled, refreshing” zone, while the unprotected can was already well into warm territory. And the best part? – Even at the 90-minute mark, the IceCozy setup was still holding at just 8c — still within the refreshing zone — while the open can had climbed to nearly 14c.
Here is the formulation I have arrived at, and it works really well. This recipe will create 400g of gel, which is enough for filling 4 IceCozies (100g in each).
Xanthan Gum Syrup Gel Recipe for Freezer Pack
Ingredients:
- 200 ml or 200 g (~¾ cup) hot water (just under boiling is best for dissolving sugar)
- 200 g (~1 cup) white sugar (1:1 sugar-to-water ratio)
- 0.6 g xanthan gum (≈¼ teaspoon)
- 3–5 g salt (½ to 1 tsp)
Steps:
- Mix dry ingredients: Combine sugar, xanthan gum, and salt in a large bowl. Stir/mix well.
- Add hot water: Pour the hot water onto the dry mix and whisk for 30–60 seconds until smooth.
- Let rest 5–10 min: It will thicken as it cools.
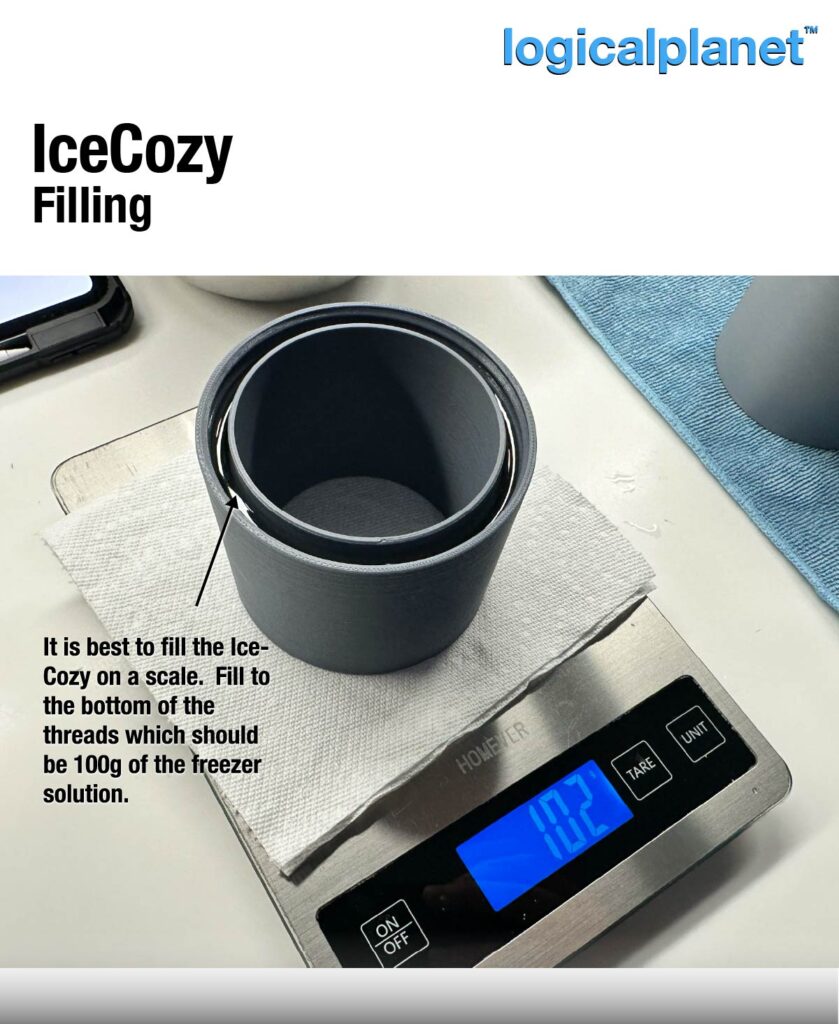
- Pour into IceCozy cup up to the threads while warm. Exactly 100g (3.5 oz) of solution is perfect in one IceCozy.
How to Get the Best Cooling Performance
- Pre-chill your drink – Start with a can that’s been refrigerated for several hours — the IceCozy is designed to maintain cold, not create it.
- Freeze your IceCozy solid – Let it freeze overnight for best results. The syrup-based gel stays colder longer than regular ice. Freeze several so you have more standing by when needed.
- Assemble just before use – Place the frozen IceCozy inside the DrinkColder and drop your can in.
- Keep it out of the sun – Use the DrinkColder to create additional insulation and shade your beverage from the sun. For even greater effect, keep the DrinkColder out of the direct sun.
- Don’t open it often – Every time you lift the can, you let warmth in — keep it sealed when not sipping.
IMPORTANT:
This method of keeping your beverage cool depends entirely on starting with a refrigerated drink. The IceCozy contains about 100 ml of syrup, while a 12 fl oz beverage holds approximately 355 ml of liquid. That gives the IceCozy about 8,000 J of thermal capacity compared to the drink’s 20,800 J. In other words, it’s not designed to chill a warm beverage — only to help keep a cold one cold for longer.
Freezing the IceCozy means -18c (freezer temperature).
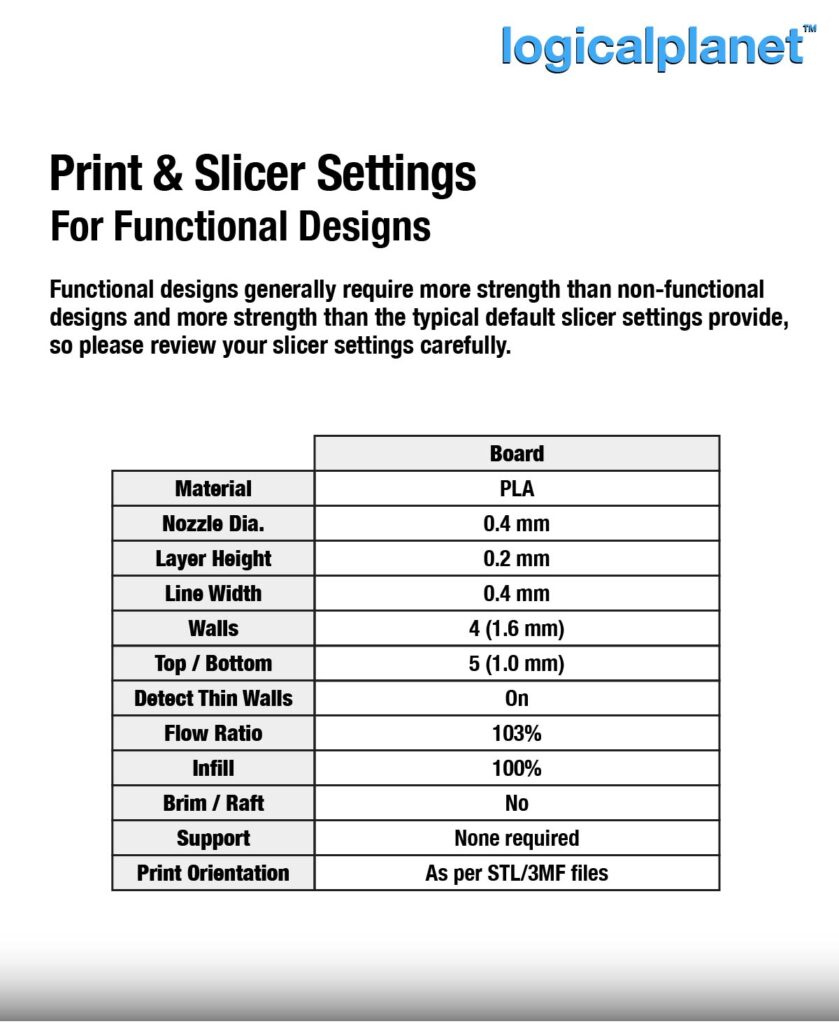
Print Settings
Functional designs (such as this one) generally require more strength than non-functional designs and more strength than the typical default slicer settings provide, so please review your slicer settings carefully.
In order to make these parts more likely to retain water, please set the Flow Rate to 103% in your slicer. If needed, you can go higher up to 105%.
This product was designed for a 0.4mm nozzle, a 0.2mm layer height. For best results I suggest the following:
Assembly Notes
There is not too much to say about assembly. Make your solution, and while it is still warm, pour it into the IceCozy cup. I have included a design for a funnel to help with this process but you could also use a squeeze bottle.
Fill the solution up to the threads. You do not need to leave headspace beyond that as there is a gap in the lid.
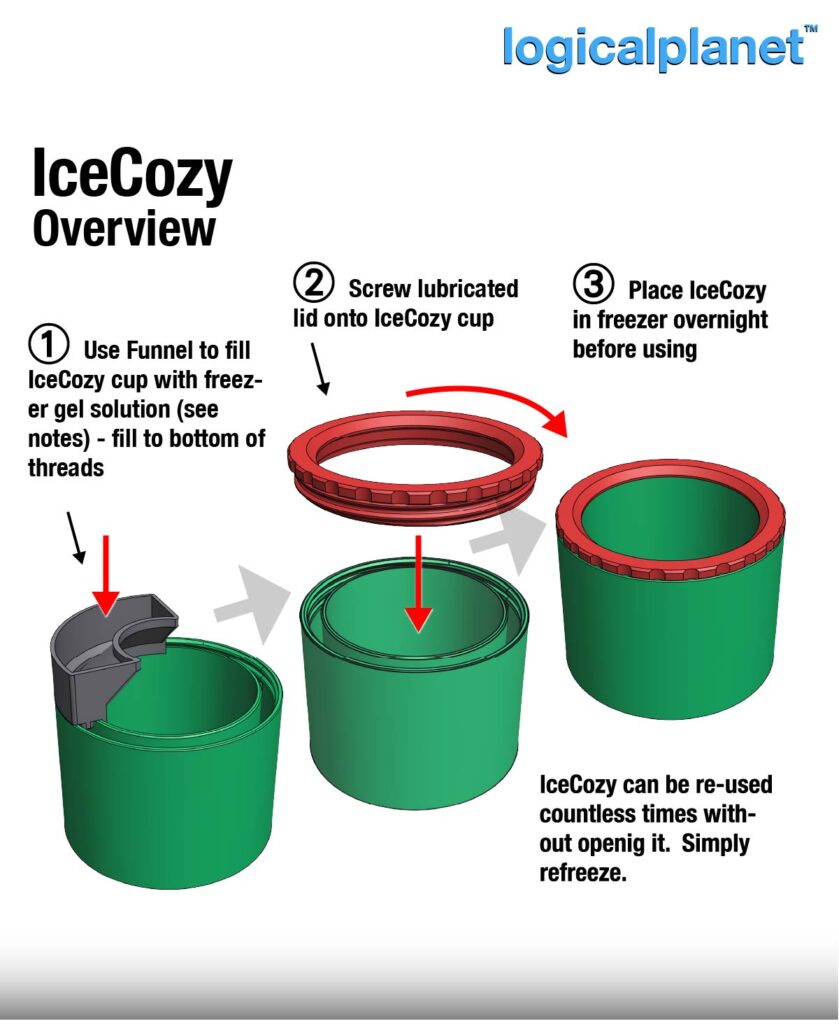
It can be very beneficial to apply some lubricant or cooking oil on the threads of the lid before screwing it into place.
Leave a Reply